
For audio OEMs, a custom speaker cover is a rigid metal grille mounted in front of a speaker driver. Before requesting a quote, define the drawing revision, hole pattern, logo and finish. Before releasing production, approve a finished sample against agreed fit, appearance and, where applicable, acoustic requirements. The two checklists below give buyers and engineers a shared record of what to quote and what to approve.
What Are Custom Speaker Covers?
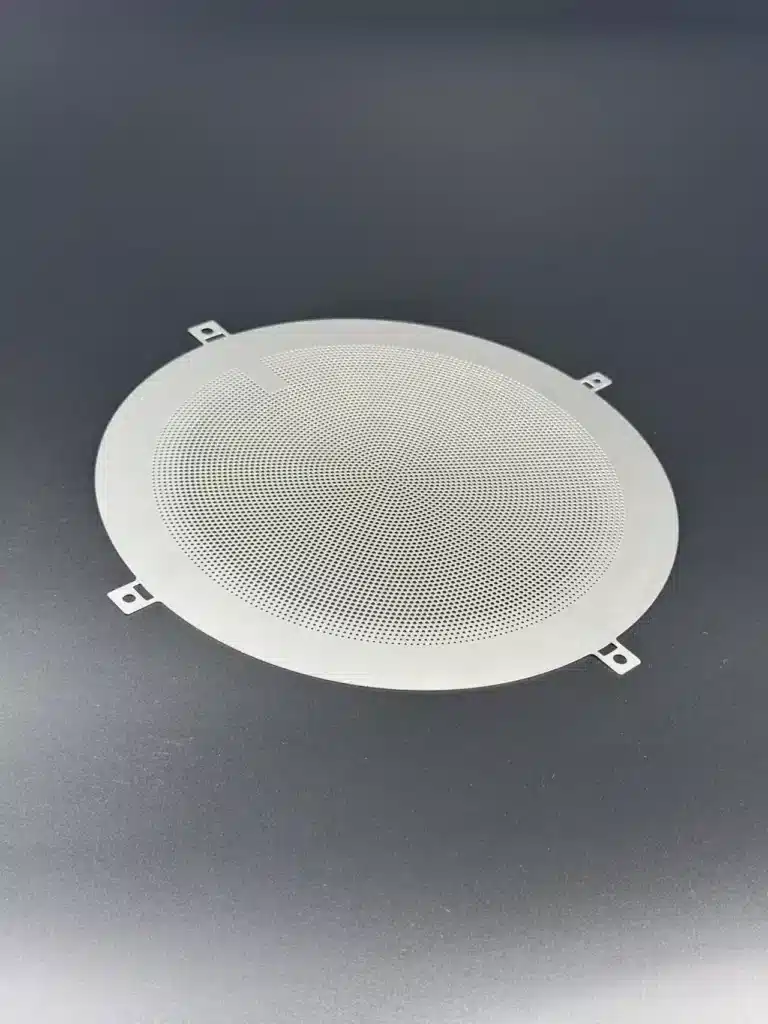
A custom metal speaker grille, sometimes called a speaker grill cover, is the perforated front panel that helps protect the driver from direct contact while allowing sound to pass. Think of the branded metal face of a soundbar or the grille over a car door speaker. Fabric grille cloth is a separate design choice. A removable transport cover protects equipment during storage and handling and is outside this guide.
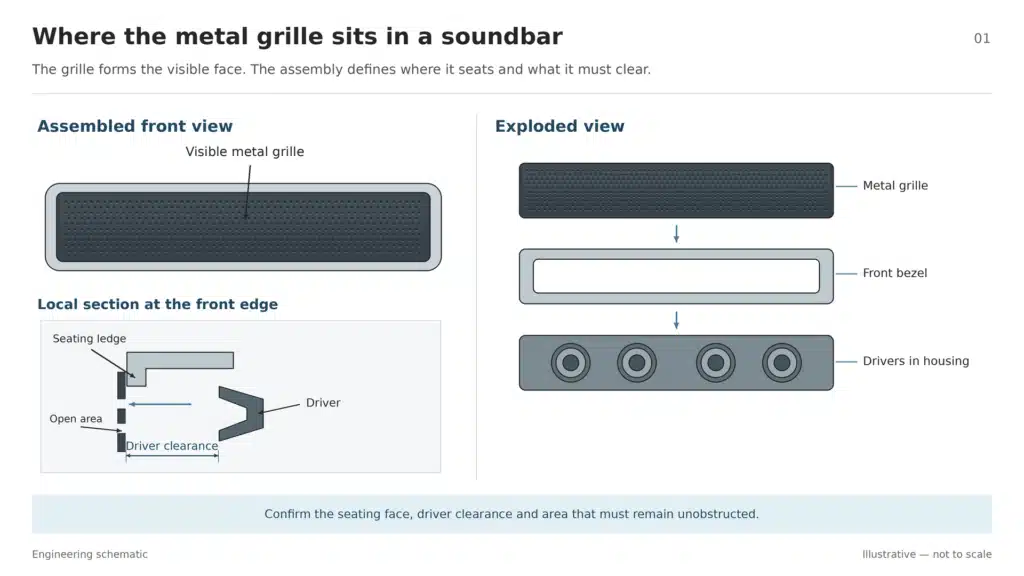
When you ask for a custom cover, show where the metal grille sits in the product. A front view tells the supplier what the customer will see. An assembly view shows where the grille seats, what it must clear and which openings must remain unobstructed. Put both in the quote package if the grille drawing alone leaves those relationships unclear.
How to Specify Custom Speaker Covers for OEM Production
Use the first three steps to settle the engineering inputs. Then use the logo brief, request for quotation (RFQ) and finished-sample checklist to carry those decisions from design into purchasing and production.
Step 1 — Confirm the Application and Drawing Revision
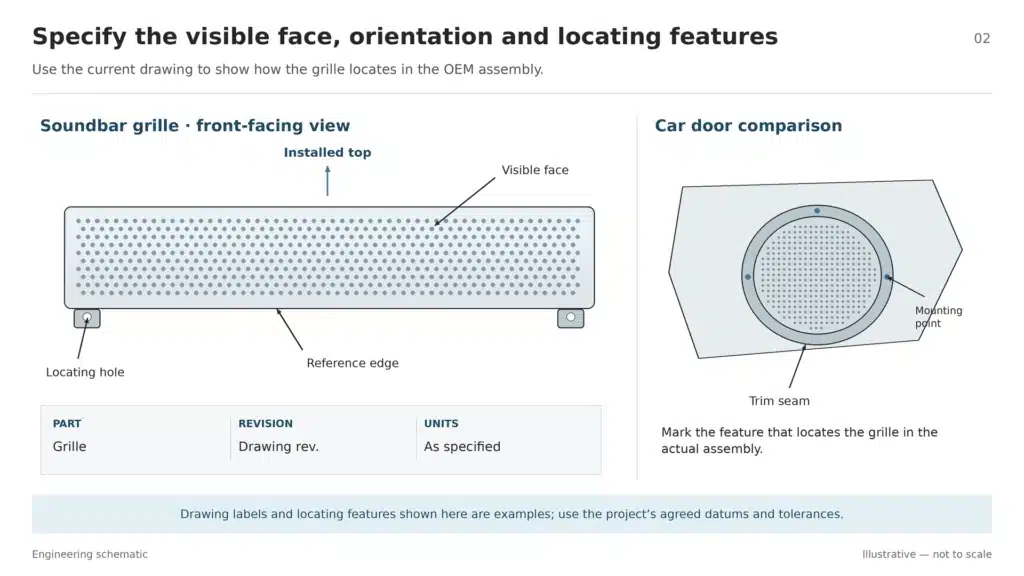
Start with the part number, drawing revision, units and matching CAD file. Mark the visible face and installed orientation. Identify the surfaces or holes that locate the grille and show the mating parts that control fit. If your drawing uses geometric tolerances, specify the applicable dimensioning and tolerancing convention and identify the datums the supplier should use for inspection.
Two black grilles can call for very different drawings. On a soundbar, the industrial designer may care most about alignment with a long front bezel. On a car door, the mounting points and the edge against the trim may drive fit. Show the relationship that matters for your assembly. If hole size, pitch or open area is still undecided, work through the speaker grille design guide before treating the perforation drawing as final.
Step 2 — Confirm Material and Surface Finish Requirements
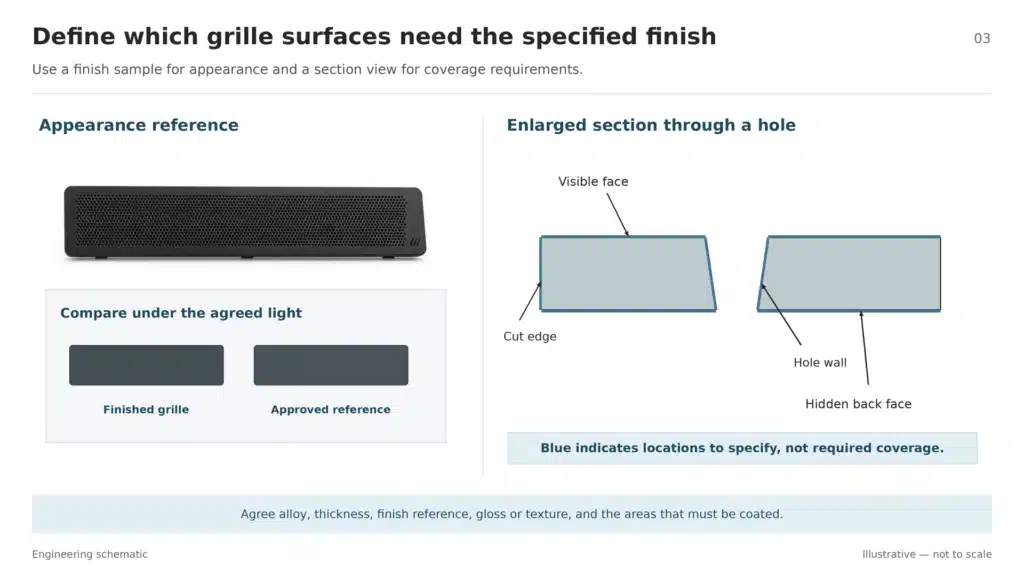
Specify the alloy grade, sheet thickness, intended environment and required finish. Flag any conditions the supplier should account for, such as exposure to a specified cleaner. If you allow an alternative material or finish, ask for it as a separate quote option and require written approval before substitution. For example, if you choose decorative anodizing on aluminum, specify the appearance and protective requirements for that coating rather than relying on the word “anodized.”
Describe the appearance you intend to buy. Give the supplier a color reference or a physical sample, the required gloss or texture, and a drawing that distinguishes visible faces from hidden areas. Call out whether cut edges and hole walls need coverage. For painted finishes, you can agree on a visual paint color comparison under controlled lighting. Where instrumented gloss is relevant, specify the measurement geometry and acceptance range using an applicable gloss measurement method.
Step 3 — Document Acoustic and Fit Acceptance Criteria
Send the approved hole pattern, identify openings that must remain clear, and specify the installation gaps or clearances that matter. Define where to measure critical dimensions and whether acceptance applies after coating. For fit, tell the supplier which mating part, fixture or assembly the sample must be checked against. This gives both teams the same reference when investigating a mismatch.
Grille thickness and hole geometry can affect a tweeter’s frequency response. Use the acoustic transparency guide for design background. If the project requires acoustic approval, name the test owner, the reference configuration, the frequency band and the allowed deviation. Run the comparison on the agreed assembled product with the finished grille. IEC 60268-21 provides an acoustical measurement framework for loudspeakers and sound systems; the OEM still needs to set its own acceptance limits.
Step 4 — Specify the Logo and Visible Surface
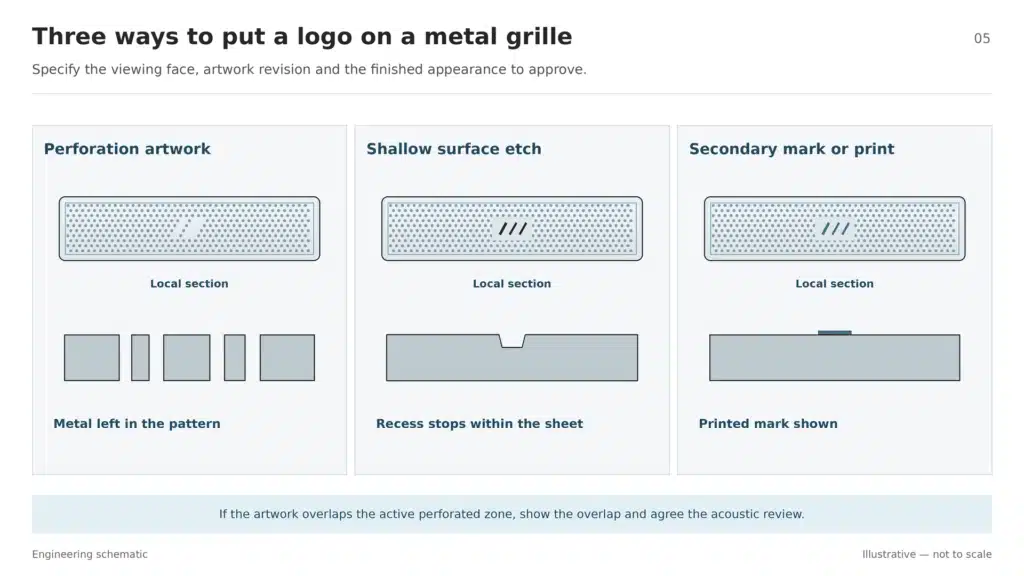
Yes, a speaker grille can include a custom logo. The logo can be built into the perforation artwork, shallow-etched into the surface, or added as a separate mark or print. In photochemical etchining, patterned photoresist defines where the etchant removes metal. The artwork and etching plan can therefore define through-openings or recessed features. Ask the supplier to confirm the proposed method for the selected metal, logo details and finish sequence.
| Logo route | What to send with the RFQ | What to inspect on the finished sample |
|---|---|---|
| Logo within the hole pattern or formed by leaving metal unperforated | Vector artwork, position from a datum, viewing face, perforation zone and any area that must remain open | Logo shape and orientation, adjacent hole pattern, and any applicable acoustic result |
| Shallow surface etching | Vector artwork, face to etch, location, and either a recess depth to confirm or an agreed visual reference | Legibility and contrast after finishing; depth where specified |
| Secondary marking or printing | Marking area, color reference, proposed sequence relative to coating, and any durability requirement | Position, edge definition, color and any agreed durability check |
Give artwork its own revision and specify the front-facing view. If the logo overlaps an active perforated zone, show that overlap on the drawing and have the acoustic team review it. If the goal is simply for the logo to read clearly, agree what acceptable contrast looks like on the finished grille. Requesting a deeper mark without defining that result leaves the supplier guessing about what you will accept.
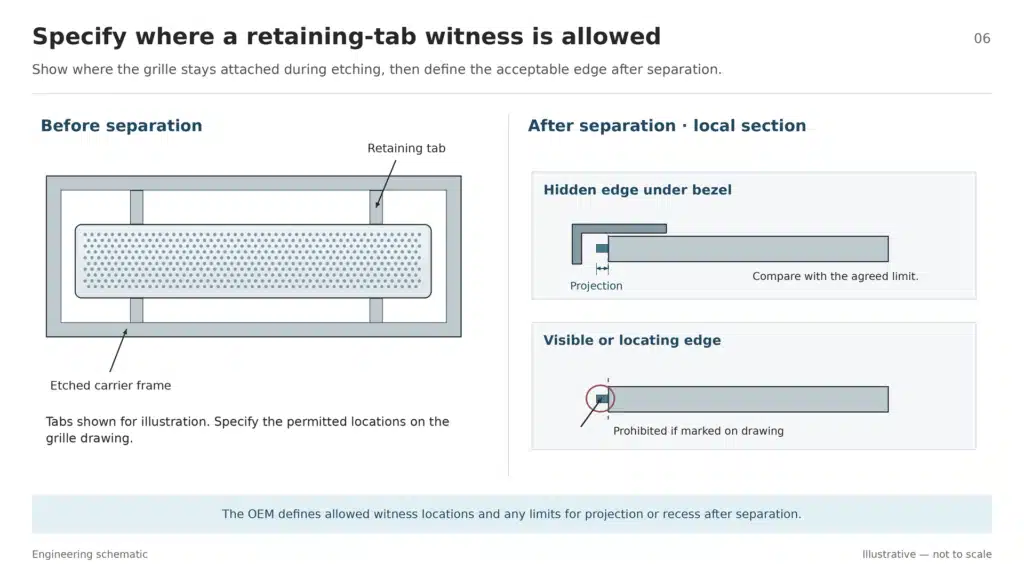
TMNetch case: a small edge feature with a clear acceptance condition. In a documented TMNetch etching order, a customer asked whether small connection points were defects. The factory explained that they were intentional connections and could be made smaller where the design and process allowed. The customer accepted them provided they stayed clear of the part’s functional area.
For a speaker grille RFQ, apply that same decision explicitly: mark any exposed or locating edges where tab marks are prohibited, and agree which hidden edges may carry a witness and how much projection or recess is allowed after separation. The order illustrates an edge acceptance decision that a grille buyer can adopt.
Step 5 — Build an RFQ for Prototypes and Volume Orders
Use this checklist when requesting quotes for custom-made speaker covers. Send the same revision and scope to every bidder. Ask for separate sample and production pricing so you can compare offers with the same finishing, inspection and packaging assumptions.
| RFQ field | What to include |
|---|---|
| Part and revision | Part number, released drawing or identified draft, revision, units, CAD, critical dimensions and mounting datums |
| Material and finish | Alloy grade, thickness, visible face, color reference, gloss or texture, coverage boundaries and substitution rules |
| Grille and logo | Hole pattern revision, areas to keep open, vector artwork, logo dimensions, location and front-facing orientation |
| Quantities and timing | Sample quantity, first production lot, expected repeat lot size and order frequency, and target dates |
| Acceptance and delivery | Sample approver, inspection records, acoustic test owner if applicable, packaging, lot identification and change notification |
Ask suppliers to state their proposed manufacturing and finishing route, sample lead time, production lead time and price breaks. Have them list exclusions and deviations against the drawing. A quote for a bare etched blank is a different offer from a quote for a finished grille that includes coating, marking and inspection. Ask what evidence will come with the sample, such as a dimensional report, marked-up inspection drawing or finish record.
Request a Quote for Custom Speaker Grilles. Have your drawing, finish reference and logo artwork ready to share when the supplier follows up.
Step 6 — Approve a Finished Sample and Release Production
Approve a sample that represents the intended production route as closely as possible. Record its ID, drawing and artwork revisions, manufacturing route, finish, inspection results, approver and date. If the sample uses a different process or material, record the difference and decide what needs rechecking on production-representative parts. Use the approved drawing for dimensional limits and the agreed physical sample for visual comparison.
| Acceptance item | What to check on the sample | What to carry into production |
|---|---|---|
| Dimensions and fit | Check profile, hole positions and mounting features; trial-fit against the agreed mating part or fixture | Keep the critical dimensions, inspection method and reporting requirements |
| Finish and appearance | Compare color, gloss and texture under agreed conditions; check for scratches, exposed substrate or other defined flaws | Retain the approved reference or limit sample and specify how each lot is inspected |
| Logo and hole pattern | Check logo orientation, location and legibility, along with the pattern and protected areas | Lock the artwork and hole-pattern revisions; route changes for approval |
| Acoustics and packaging | Verify acoustic requirements where specified; check how packaging protects the visible face | Record the test owner, packaging method and lot identification |
A signed sample gives the supplier a reference for repeat orders. Agree separately how each lot will be accepted. If you use acceptance sampling by attributes, agree on the defect categories, sampling plan and acceptance rules before shipment. For a visible flaw, identify where it is allowed and how it will be judged. A mark that is acceptable behind the bezel may be unacceptable next to the logo.
Close the release with a short change list. Agree when the supplier must notify you about changes to material, etch artwork, logo, coating, production site or packaging. Decide which changes require a new finished sample and which require only a focused check. A logo artwork change calls for a visual review; a change to the perforation pattern may also trigger acoustic review if the pattern lies over the driver.
FAQs About Custom Speaker Covers for OEMs
Can Speaker Grilles Include a Custom Logo?
Yes. Depending on the design, the logo can be integrated into the perforation artwork, recessed by surface etching, or added by a separate marking or printing step. Specify the viewing face, placement and finish, then approve the logo on the finished sample.
What Should I Send for a Custom Speaker Cover Quote?
Send the drawing and revision, alloy and thickness, finish reference, hole pattern, logo artwork, required quantities and acceptance criteria. Use the RFQ checklist and ask the supplier to identify deviations and quote sample and production orders separately.
When Should an OEM Approve a Speaker Grille Sample?
Approve the finished sample before authorizing volume production. Confirm that it matches the agreed drawing and artwork revisions and meets the project’s fit, appearance and applicable acoustic criteria. Keep the approved records and reference sample available for later lots.
Conclusion
A custom speaker grille is ready for production when the buyer and supplier can identify the same part revision, show what an acceptable finished part looks like and explain how the next lot will be checked. Put those decisions in the RFQ and carry them into the signed sample record. That gives the logo, finish and fit a clear acceptance standard from the first sample through repeat orders.