
Photo etched model parts, 3D-printed parts, and injection-molded parts can all improve the detail and function of a scale model. However, they solve different manufacturing problems.
Photo etching is usually the strongest choice for very thin metal details, fine openings, flat panels, railings, and parts that can be formed from sheet metal. Resin 3D printing is usually better for complex three-dimensional shapes, curved surfaces, deep recessed features, and fast design changes. Injection molding is usually better for repeatable plastic parts when the design is stable and production volume can justify dedicated tooling.
The best process therefore depends on the geometry, material, scale thickness, surface requirement, production volume, and stage of product development. A professional model kit may use all three processes instead of forcing every component into one production method.
Quick Comparison: Which Process Is Better?
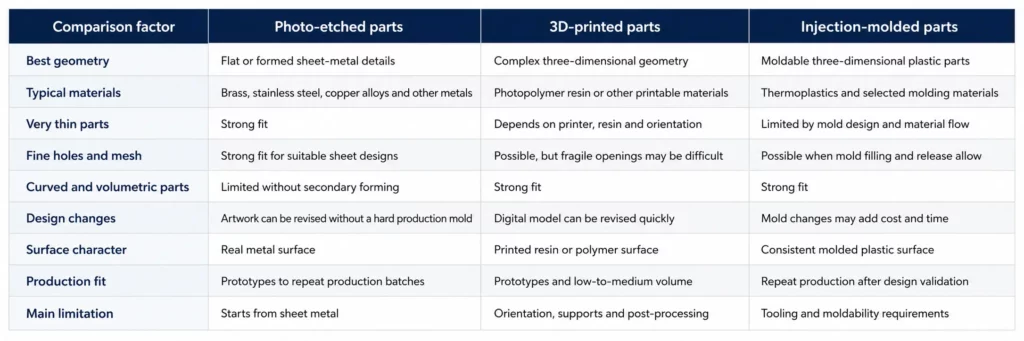
The comparison table is a starting point rather than a universal ranking. A thin ship railing and a detailed engine block may belong in the same model kit, but they should not be produced with the same process.
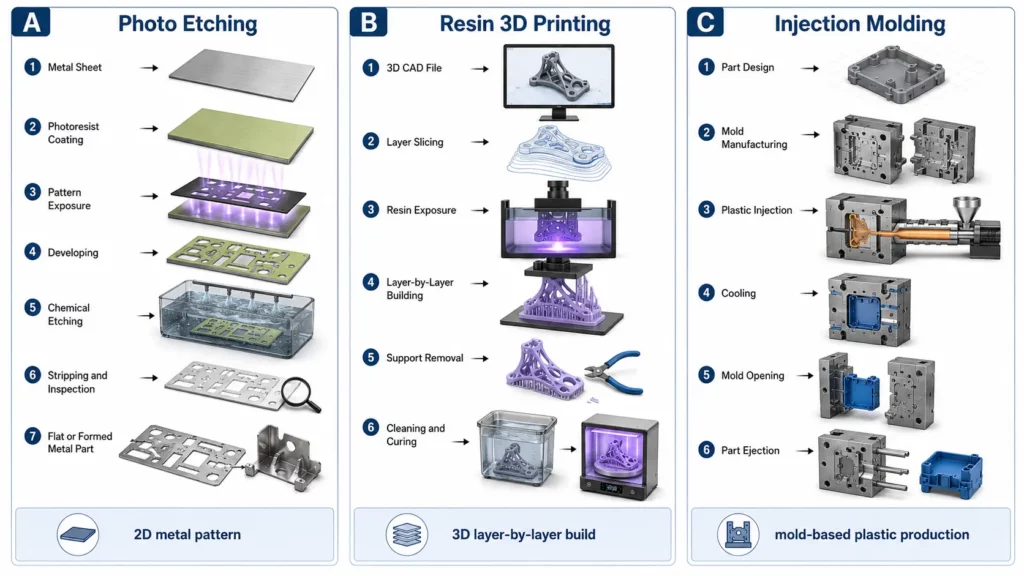
How the Three Manufacturing Processes Work
Photo Etching
The photo etching process transfers a two-dimensional pattern onto a metal sheet. A photoresist protects the areas that must remain, while controlled chemistry removes the exposed metal.
TMNetch describes photo etching as a non-contact process that does not require traditional dies or molds for the flat metal pattern. Its published process includes cleaning, coating, exposure, developing, etching, stripping, and inspection.
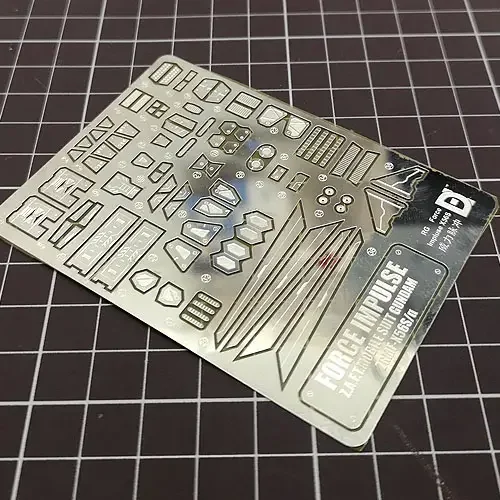
Photo etching can produce complete openings, slots, outlines, fine patterns, and partial-depth details. The flat blank may then be bent, formed, plated, polished, cleaned, or packaged according to the final model design.
Resin 3D Printing
In resin 3D printing, a light source cures liquid resin into hardened plastic one layer at a time, building the part from a three-dimensional digital model.
This process can create curved surfaces, raised features, recessed details, hollow structures, and complex forms that cannot be produced from a flat metal sheet. It is often used for seats, figures, engines, equipment housings, turrets, cockpit components, and other fully three-dimensional details.
Printed parts usually require cleaning and curing. Supports may also need to be removed, and visible surfaces may need sanding, coating, or other finishing.
Injection Molding
Injection molding forces heated material into a shaped mold cavity. After cooling, the mold opens and releases the finished part.
This process can repeatedly produce complete model bodies, shells, interior structures, wheels, frames, panels, and other plastic components. However, the design must account for wall thickness, material flow, cooling, parting lines, gates, ejector locations, undercuts, and draft.
Injection-molded parts generally require uniform wall thickness because uneven sections can increase the risk of sink marks, warpage, internal stress, and dimensional inaccuracy. Draft is also important because it allows the part to leave the mold without scraping, bending, or damaging the component.
Which Process Produces the Best Fine Detail?
The answer depends on what “fine detail” means.
Procurement teams should compare at least five separate factors:
- Scale-appropriate thickness.
- Edge and opening definition.
- Three-dimensional depth.
- Surface finish.
- Dimensional consistency.
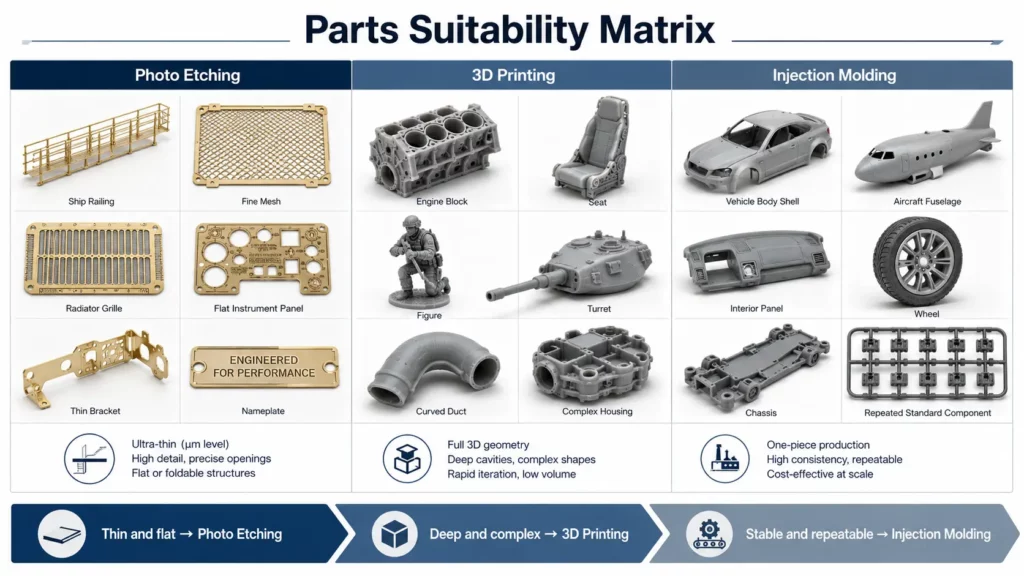
Very Thin Railings, Mesh, and Flat Details
Photo etched model parts for scale models are often the strongest option when the detail must be made from very thin metal.
Typical examples include:
- Ship railings and ladders.
- Aircraft instrument panels.
- Vehicle radiator grilles.
- Fine screens and mesh.
- Architectural stairs and walkways.
- Nameplates, badges, and flat trim.
- Thin brackets and access panels.
TMNetch states that its model parts can be produced as thin as 0.05 mm for applications such as railings, mesh, and panels. It also lists stainless steel, aluminium alloys, copper alloys, nickel-based alloys, and titanium alloys as available material groups. Final feasibility still depends on the metal, thickness, pattern, and drawing review.
A 3D printer may reproduce the outline of a thin railing, but the printed section may need extra thickness for stability. Injection molding may also require thicker sections so plastic can fill the cavity and release from the mold.
This is why the smallest visible feature is not the only measure of quality. A feature may be printable or moldable but still look too thick at the required scale.
Raised, Recessed, and Curved 3D Details
Resin 3D printing is usually the stronger choice when the part needs full depth rather than sheet thickness.
Examples include:
- Seats and cushions.
- Engine blocks.
- Turrets and weapon housings.
- Figures and character parts.
- Pipes and curved ducts.
- Deep cockpit structures.
- Complex mechanical assemblies.
- Organic shapes and curved surfaces.
Resin printing can create these shapes directly from a 3D file. Photo etching can add recesses, textures, and fold lines, but it does not offer the same geometric freedom as a fully additive process.
Repeatable Molded Surface Details
Injection molding can produce detailed plastic surfaces repeatedly after the mold has been validated. This can be useful for mass-market model bodies, shells, interior panels, wheels, and other standard parts.
The limitation is moldability. A detail must allow the plastic to flow, cool, and release. Deep vertical walls, undercuts, variable wall thickness, and complex textures can make the mold more difficult or require additional tooling actions.
Accuracy Is Not the Same as Visual Detail
A supplier may quote dimensional accuracy, but this does not fully describe how realistic the part will look.
For photo etching, buyers should review:
- Material thickness.
- Opening size.
- Bridge width.
- Edge profile.
- Half-etched depth.
- Flatness.
- Bend location.
For 3D printing, buyers should review:
- Layer resolution.
- Pixel or laser characteristics.
- Build orientation.
- Support contact areas.
- Resin shrinkage.
- Curing and finishing.
- File resolution.
For 3D-printed parts, build orientation can affect dimensional accuracy, support requirements, surface quality, and overall production cost. Stratasys also notes that some orientations may create more visible layer lines or require more support structures.
For injection molding, buyers should review:
- Mold dimensions.
- Material shrinkage.
- Wall thickness.
- Gate and ejector locations.
- Parting lines.
- Cooling.
- Draft.
- Tool wear over repeat production.
The correct comparison is not simply “Which process has the smallest tolerance?” It is “Which process can reproduce this specific feature at the correct scale, appearance, strength, and production quantity?”
Material and Surface Comparison
Photo etching creates real metal components. This can be important when the visible part should have the colour, reflectivity, stiffness, or weight of photo-etched brass, stainless steel, nickel alloy, or another metal.
A printed resin part can simulate a metal appearance after painting or plating, but the base component remains a printed polymer. It may be the better choice when the shape is more important than the use of real metal.
Injection-molded plastic offers a consistent surface and can be coloured through the resin or finished after molding. It is suitable for model bodies and standard parts that need repeatability rather than an exposed metal surface.
The buyer should therefore ask:
- Must the component be real metal?
- Will the part remain unpainted?
- Does it need to bend?
- Must it hold a formed shape?
- Is the surface cosmetic or functional?
- Will several materials be combined in the final kit?
Tooling, Design Changes, and Development Speed
Photo etching uses patterned artwork rather than a hard production mold for the sheet-metal geometry. This can support design changes during prototype and repeat-batch development.
3D printing also supports fast changes because the digital model can be revised before the next build. However, a new orientation, support plan, curing method, or surface treatment may still require validation.
Injection molding normally requires more commitment before production. The part must be designed for mold release and stable material flow. Changes made after tool production may require mold modification or replacement.
Protolabs identifies uniform wall thickness and draft as two important design changes when moving from additive manufacturing to injection molding.
A practical development route may be:
- Use 3D printing to test full three-dimensional geometry.
- Use photo etching to validate thin metal details.
- Freeze the final plastic design.
- Build the injection mold for repeat production.
- Continue supplying metal detail frets as separate upgrade components.
Cost and Production Volume
No fixed quantity determines the best process for every project.
Photo-etching cost depends on:
- Material and thickness.
- Sheet size and panel layout.
- Feature density.
- Full-etch and half-etch requirements.
- Secondary forming or finishing.
- Quantity per fret.
- Inspection and packaging.
3D-printing cost depends on:
- Part volume.
- Build height and orientation.
- Resin type.
- Support material.
- Machine time.
- Cleaning, curing, and finishing.
- Rejection risk.
Injection-molding cost depends on:
- Mold complexity.
- Tool material.
- Cavities.
- Side actions and inserts.
- Plastic material.
- Cycle time.
- Production quantity.
- Tool maintenance.
Injection molding may reduce unit cost when a stable design is produced repeatedly, but tooling creates a larger early commitment. Printing may avoid mold investment, while photo etching can avoid a hard tool for suitable flat metal geometry.
Buyers should compare total project cost rather than only the quoted unit price.
Advantages and Limitations
Photo-Etched Model Parts
Advantages
- Very thin real-metal components.
- Fine holes, slots, mesh, and flat patterns.
- Clean, repeatable sheet geometry.
- Design changes without a hard production mold.
- Multiple parts can be arranged on one fret.
- Parts can be folded or formed after etching.
Limitations
- Starts from sheet metal.
- Not ideal for thick volumetric forms.
- Fine bridges may be fragile.
- Fold design needs careful review.
- Some parts require secondary forming.
3D-Printed Model Parts
Advantages
- High freedom for complex 3D geometry.
- Fast digital design changes.
- Suitable for prototypes and custom variants.
- Strong fit for curves, recesses, and organic shapes.
- No injection mold is required.
Limitations
- Orientation affects quality.
- Supports may mark the surface.
- Thin sections may be fragile.
- Cleaning, curing, and finishing may be required.
- Production consistency depends on controlled printing and post-processing.
Injection-Molded Model Parts
Advantages
- Repeatable production after tool validation.
- Strong fit for plastic bodies and standard components.
- Consistent colour and surface options.
- Multiple features can be integrated into one molded part.
- Efficient for stable repeat-production programs.
Limitations
- Requires dedicated tooling.
- Design changes may be costly.
- Parts must follow molding rules.
- Gates, parting lines, ejectors, and draft can affect appearance.
- Very thin independent details may be difficult to mold.
Best Process for Different Model Parts
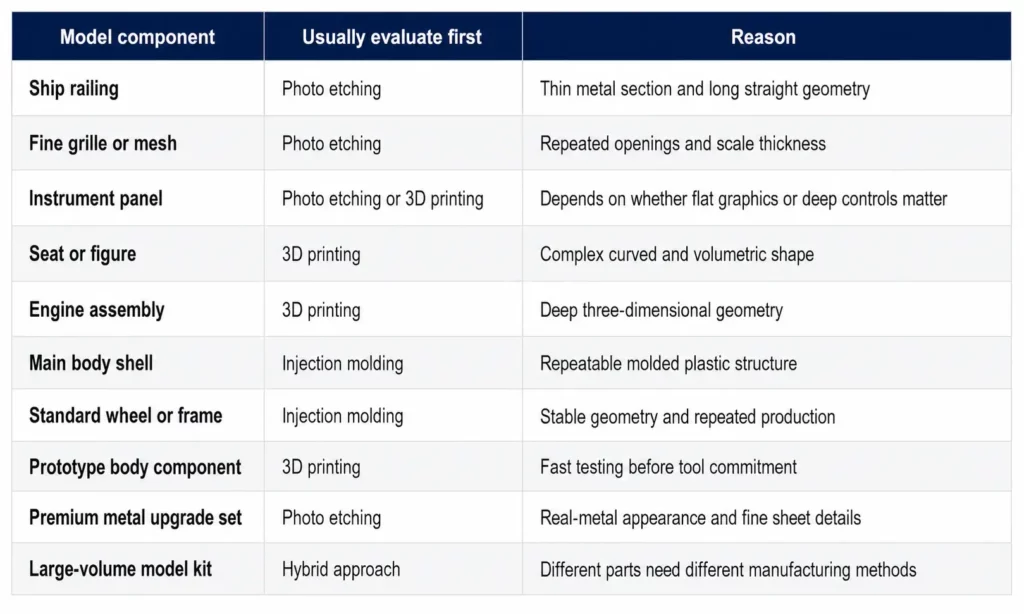
When a Hybrid Manufacturing Strategy Is Better
A model manufacturer does not need to select one process for the entire product.
A practical premium kit may use:
- Injection-molded plastic for the main body and large structural parts.
- 3D-printed resin for complex optional accessories or limited-edition components.
- Photo-etched metal for railings, grilles, screens, brackets, panels, and badges.
This approach allows each process to work within its strongest geometry.
Hybrid manufacturing also supports product tiering. A standard kit may contain molded parts, while a premium version adds resin accessories and a metal detail fret. The same basic product can therefore serve different markets without redesigning every component.
How to Select the Process and Supplier
Before requesting quotations, prepare:
- A 2D drawing for flat metal components.
- A 3D CAD model for printed or molded components.
- Required material.
- Critical thicknesses.
- Minimum features.
- Cosmetic surfaces.
- Tolerances.
- Prototype and annual quantities.
- Assembly method.
- Finish and colour.
- Packaging format.
- Expected product life.
Use a chemical etching supplier checklist and ask each supplier to identify:
- Features that are difficult to manufacture.
- Areas that need thicker sections.
- Support, tab, gate, or ejector locations.
- Expected secondary processing.
- Inspection methods.
- Revision-control procedures.
- Sample-validation requirements.
Do not approve a process because it can produce one attractive sample. Confirm whether it can maintain the required appearance and dimensions across repeat batches.
Where TMNetch Fits in a Hybrid Model-Part Manufacturing Strategy
TMNetch’s role in a hybrid model kit is to produce thin metal details that may be difficult to achieve with 3D printing or injection molding.
- Focus on thin metal geometry: TMNetch can review railings, mesh, grilles, flat panels, brackets, badges, and other sheet-metal details.
- Coordinate with printed and molded parts: Drawings should define locating slots, attachment points, bend directions, clearances, and assembly interfaces.
- Support final delivery requirements: TMNetch lists forming, plating, polishing, cleaning, inspection, and packaging as available secondary-process support.
This allows each manufacturing process to focus on its strongest geometry: injection molding for repeatable plastic structures, 3D printing for complex three-dimensional parts, and photo etching for thin, detailed metal components.
Frequently Asked Questions
Are photo-etched parts more detailed than 3D-printed parts?
Photo-etched parts are often better for very thin flat details, fine openings, railings, mesh, and crisp sheet-metal patterns. 3D printing is usually better for deep, curved, and fully three-dimensional details. Neither process is more detailed in every type of geometry.
Can photo-etched parts replace injection-molded details?
They can replace or supplement thin molded details such as grilles, panels, screens, and brackets. They are not a direct replacement for thick plastic bodies or complex volumetric structures.
Is 3D printing better for low-volume model parts?
It can be a strong choice for low-volume three-dimensional parts because it avoids an injection mold and supports fast digital changes. Photo etching may be more suitable when the low-volume part is thin, flat, and metallic.
When should model manufacturers use injection molding?
Injection molding should be evaluated when the design is stable, the component is moldable, plastic is suitable, and repeat production can justify tooling.
Which process is best for thin model railings and mesh?
Photo etching is usually the first process to evaluate because it can produce fine openings and scale-appropriate sheet thickness in real metal. The final design still depends on strength, bridge width, material, and handling.
Can all three processes be used in one model kit?
Yes. Injection molding can produce the main plastic structure, 3D printing can produce complex accessories, and photo etching can produce thin metal details.
Conclusion
Photo-etched, 3D-printed, and injection-molded model parts should not be ranked with one universal score.
Choose photo etching for thin metal details, fine openings, mesh, flat panels, and formed sheet parts. Choose 3D printing for complex three-dimensional shapes and fast design changes. Choose injection molding for stable, repeatable plastic components when tooling is justified.
For many professional model kits, the best answer is a hybrid process strategy. Assign each component to the manufacturing method that matches its geometry, material, appearance, and production volume.
If your project includes thin metal railings, grilles, mesh, panels, brackets, or detail frets, submit the drawing, material, thickness, quantity, and finishing requirements for a photo-etching review.