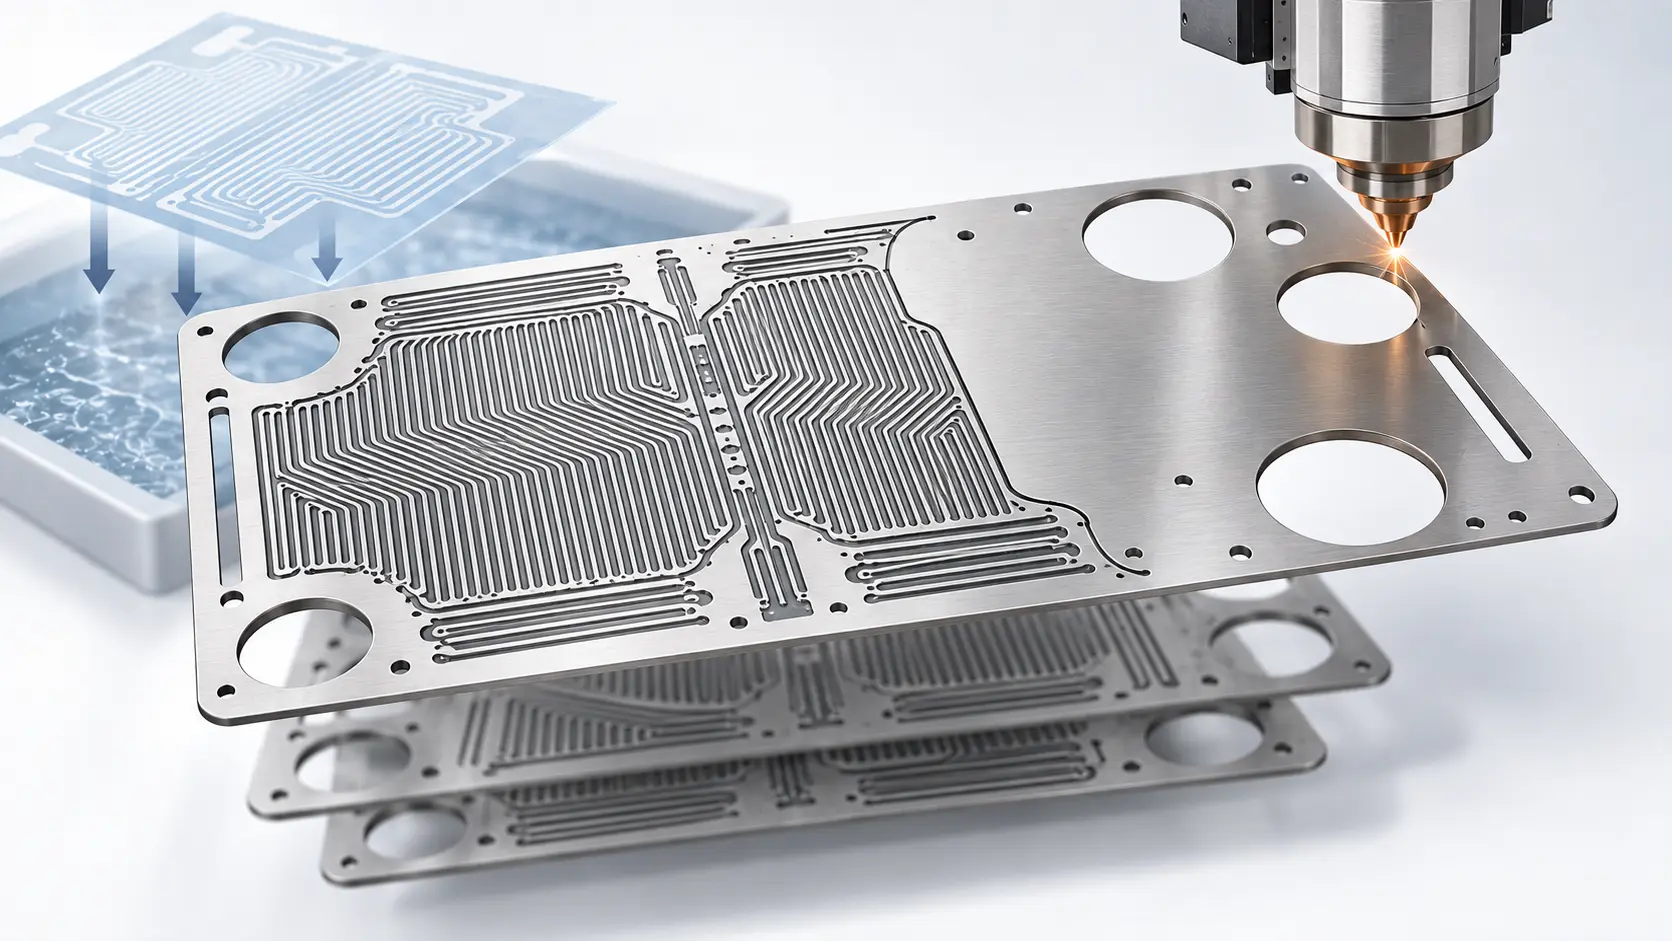

Photo-etched model parts can reproduce railings, grilles, panels, brackets, screens, vents, steps, and other details that are difficult to mold at the correct scale. However, the best part is not always the thinnest or most detailed option. Buyers must match the metal, thickness, geometry, forming method, finish, and delivery format to the final model.
For custom projects, start with the model scale and the function of each part. Then review material stiffness, bendability, fine-feature limits, assembly needs, and production quantity. A complete drawing and a design-for-manufacturing review help reduce broken features, weak bridges, poor fold lines, and fit problems before production.
Readers who need a basic process introduction can first review how photo-etched model parts work before using this selection guide.
Quick Answer: How to Choose Photo-Etched Model Parts
Use this sequence when selecting custom photo etch model parts:
- Define the model type, scale, and target level of detail.
- Classify each part as decorative, structural, formed, mesh, or layered.
- Select a metal based on rigidity, bendability, appearance, and corrosion needs.
- Choose thickness based on scale accuracy and handling strength.
- Check openings, narrow bridges, tabs, fold lines, and half-etched details.
- Decide whether parts will be supplied flat, pre-formed, plated, or paint-ready.
- Validate a prototype against the plastic, resin, or metal model body.
- Approve the supplier only after reviewing DFM support, inspection, and batch control.
The photo etching process, also called photochemical machining, uses a photoresist to define where metal is removed. Standard process stages include phototool preparation, metal preparation, masking, etching, stripping, and inspection. Dimensional limits, tolerances, and edge quality must be reviewed as part of the design.
Start With the Model Type and Part Function
A model ship, aircraft, car, train, or building may use the same manufacturing process, but the parts do not face the same design conditions.
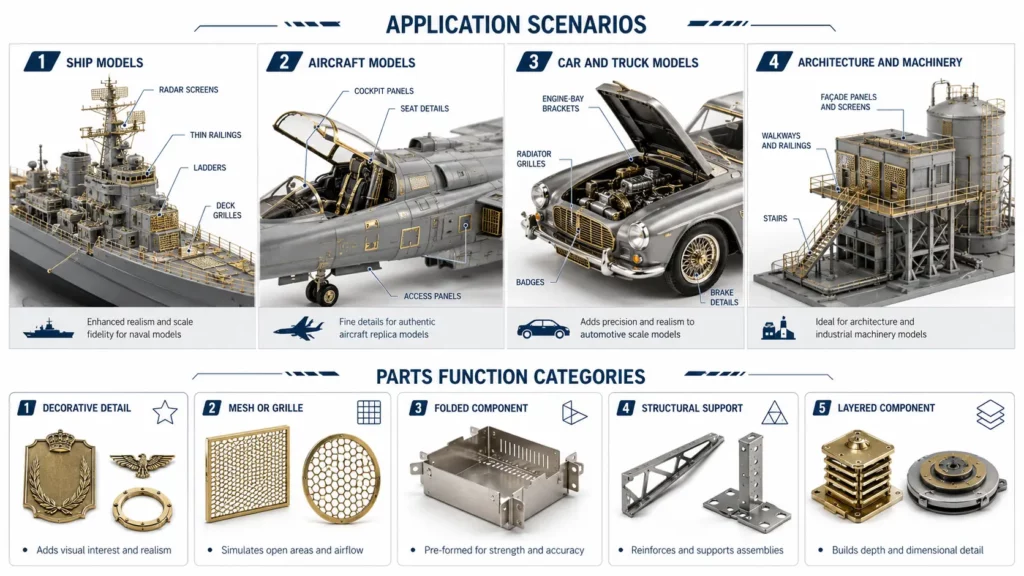
Photo-etched model ship parts often include railings, ladders, radar screens, deck grilles, doors, and platforms. These features may need long, thin sections and repeated openings. The design must balance scale appearance with enough strength for handling and assembly.
Photo-etched model aircraft parts may include cockpit panels, seat details, vents, access panels, mesh, and small brackets. Many of these parts are flat or lightly formed. Clear bend lines and accurate locating features can be more important than maximum thinness.
Photo-etched model car and truck parts often include radiator grilles, brake details, mesh, badges, brackets, engine-bay parts, and interior panels. Visible surface quality may be critical because the metal may remain exposed or receive only a thin paint layer.
Architectural and machinery models may use larger panels, screens, stairs, walkways, and façade details. These parts may need more rigidity than small decorative details.
Before selecting a material, classify the part:
- Decorative detail: Logos, badges, instrument faces, and surface panels.
- Mesh or grille: Repeated openings where flatness and open area matter.
- Folded component: Boxes, brackets, steps, frames, and rails.
- Structural support: Parts that must hold their shape during assembly.
- Layered component: Several etched layers stacked to create depth.
This classification helps the supplier decide where full etching, half etching, tabs, fold lines, or secondary forming may be needed.
Choose the Right Metal
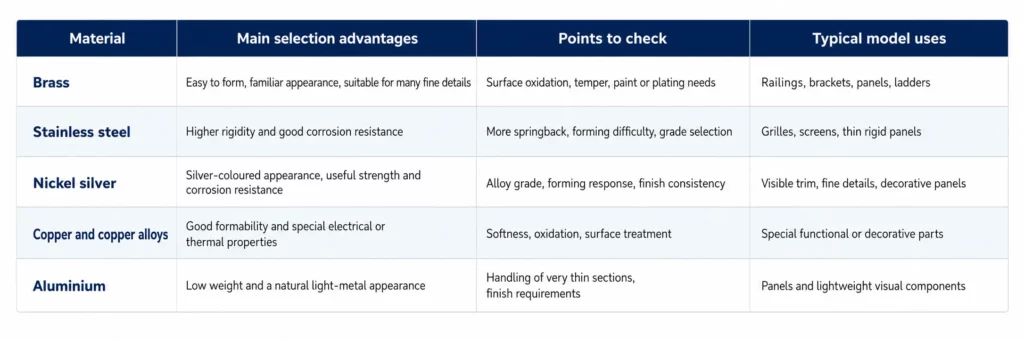
No single metal is best for every set of scale model photo-etched parts. The correct choice depends on the final appearance, forming method, stiffness, exposure conditions, and cost target.
Brass
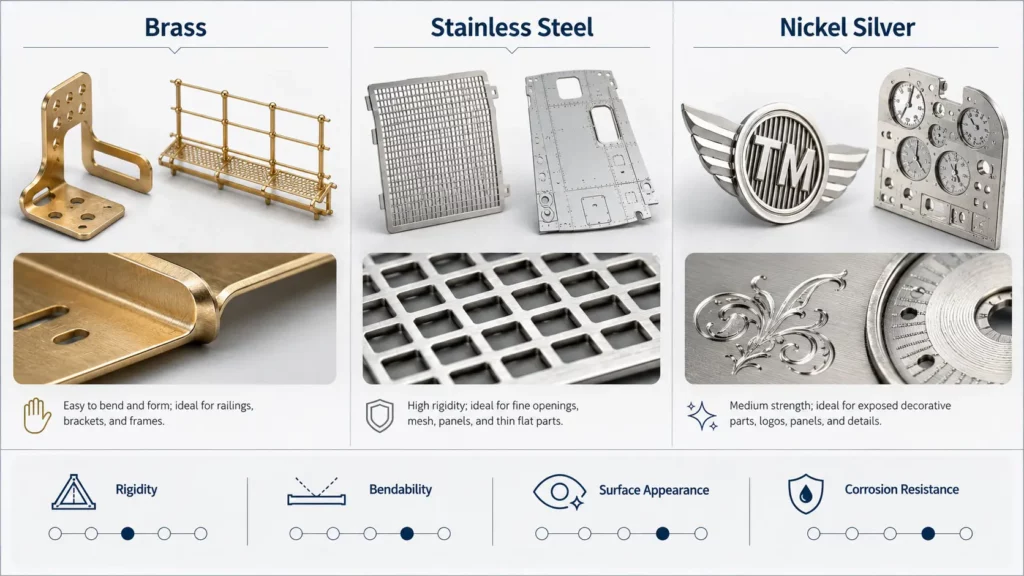
Brass is often a practical option for parts that need folds, curves, and hand assembly. Its properties vary with alloy composition and temper, so the drawing should specify the required grade when function matters.
Copper Development Association data notes that brass properties change with zinc content, including strength, elasticity, and corrosion behaviour. Buyers should therefore confirm the alloy instead of specifying only “brass.”
For custom projects, the copper and brass etching supplier should review the alloy, temper, thickness, fold direction, and required surface appearance together.
Stainless Steel
Stainless steel is useful when the design needs more rigidity, clean openings, or corrosion resistance. Its corrosion resistance comes from a chromium-rich passive oxide film that forms naturally on the surface.
The grade still matters because corrosion resistance, formability, and mechanical properties vary across the stainless steel family. A stainless steel etching review should therefore include the grade, thickness, bend requirements, and final finish.
Nickel Silver
Nickel silver is not silver-plated metal. It is a copper-nickel-zinc alloy named for its silver-like colour. It can be useful for visible details that need a bright metal appearance and moderate strength.
Material selection should be confirmed with the actual thickness, bend pattern, finish, and assembly method. A metal that works well as a flat grille may not be the best choice for a complex folded frame.
Select Thickness Based on Scale and Function
Thickness affects visual scale, stiffness, bendability, flatness, and the size of features that can be etched. Do not choose thickness only because a thinner sheet looks more realistic.
A thin railing may match the scale but bend during packaging. A thicker grille may survive handling but look heavy beside the model body. A formed box may need enough material to hold its angles after bending.
Use four questions:
- What thickness looks correct at the target scale?
- Must the part stay flat or hold a formed shape?
- Will users handle the part with tweezers, tools, adhesive, or solder?
- Are the smallest holes and bridges practical at that thickness?
TMNetch’s model-parts page states that it supplies parts as thin as 0.05 mm for features such as railings, mesh, and panels. Its broader photo-etching page lists processing from 0.02 to 1.5 mm, minimum features down to 0.05 mm, and critical-dimension tolerances as tight as ±0.025 mm under suitable conditions. These are published capability figures, not a guarantee for every material or design. Final feasibility requires drawing review.
For international RFQs, show millimetres first. Add inches in brackets only when the customer specification or drawing uses imperial units.
Check Manufacturability Before Production
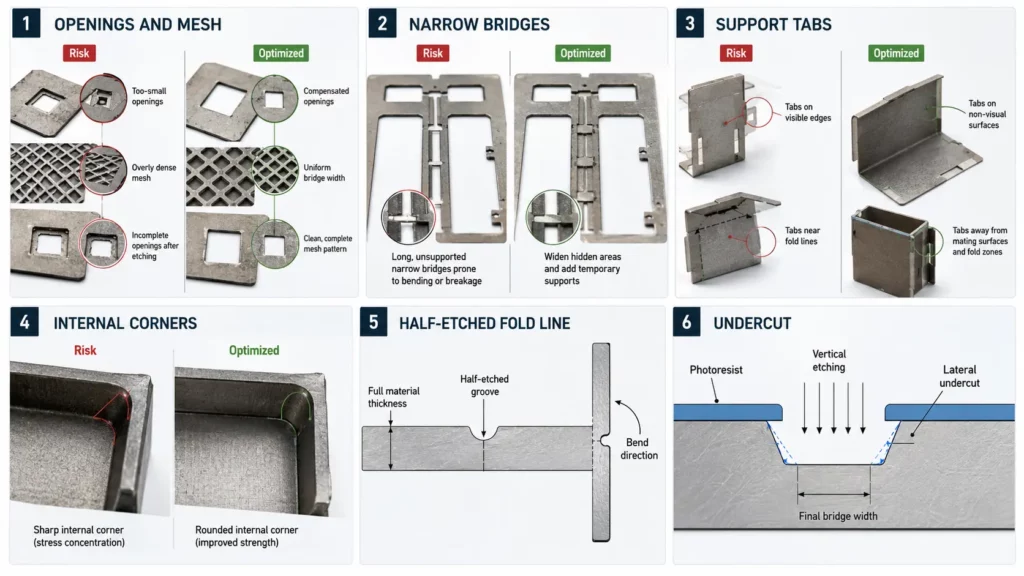
The most common design risks are not usually the overall outline. They are the small openings, thin bridges, sharp corners, weak connection points, and fold details.
Openings and Mesh Patterns
Small holes and dense mesh can be affected by material thickness and lateral etching, often called undercut. As the etchant moves through the sheet, it also removes some metal sideways. The artwork may need compensation so the final opening and bridge sizes meet the drawing.
Do not copy one minimum-hole rule across all projects. Ask the supplier to review the metal grade, thickness, feature density, sheet layout, and required tolerance.
Narrow Bridges and Fragile Sections
A narrow bridge may etch correctly but still bend or break during stripping, cleaning, removal from the fret, packing, or model assembly. Review both manufacturing strength and end-user handling.
Where possible:
- Avoid long unsupported strips.
- Add temporary support tabs.
- Increase bridge width in hidden areas.
- Use rounded internal corners.
- Separate highly fragile parts from heavier components.
Tabs and Part Release
Tabs hold parts inside the etched fret during production and shipping. Poor tab placement can leave visible marks, damage a fine edge, or make removal difficult.
Place tabs away from visible edges, fold zones, mating surfaces, and tight corners. Their number and width should reflect part size and fragility.
Half-Etched Features
Half etching removes only part of the material thickness. It may be used for recessed textures, fold lines, part numbers, logos, or locating features. TMNetch also lists half-etch, full-etch, and multi-depth processing among its published etching options.
The drawing should state:
- Which side is half etched.
- Whether the feature is visual or functional.
- The target depth when critical.
- Bend direction and bend sequence.
- Areas that must remain flat.
A fold line that is too deep may weaken the part. A line that is too shallow may cause springback or an inaccurate bend. Final depth should be reviewed against the material and thickness.
Plan Forming, Finish, and Assembly Together
A flat etched blank is not always the finished component. Some parts need bending, plating, polishing, cleaning, passivation, coating, or protective packaging.
Plan these steps before approving the drawing. Plating can reduce opening size. Forming can change final dimensions. Polishing can affect fine surface detail. A finish that looks good on a sample may show more variation across a larger production batch.
TMNetch’s one-stop chemical etching services page lists plating, forming, polishing, cleaning, inspection, and packaging as related secondary processes. The correct process route depends on the part function and final assembly requirements.
The RFQ should also state how the parts will be assembled:
- Cyanoacrylate or another adhesive.
- Soldering.
- Tabs and slots.
- Mechanical fasteners.
- Insertion into a plastic or resin body.
- Stacking of several etched layers.
Ask whether the supplier will deliver parts flat on a fret, separated, pre-formed, or packed as complete sets. This affects inspection, packaging cost, and assembly labour.
Prepare a Complete RFQ Package
A clear RFQ reduces quotation errors and shortens the technical review. Include:
- A 2D drawing or vector artwork.
- Model type and scale.
- Material grade and temper, when known.
- Sheet thickness.
- Full-etch and half-etch layers.
- Critical dimensions and tolerances.
- Bend lines and bend direction.
- Cosmetic surface requirements.
- Plating, coating, polishing, or passivation.
- Quantity per set.
- Prototype quantity and expected production volume.
- Flat, formed, or assembled delivery.
- Packaging, label, and SKU requirements.
- Target delivery market.
Common drawing formats include DXF, DWG, STEP, vector PDF, and AI. A dimensioned drawing should identify critical features instead of relying only on the scale of the artwork. TMNetch’s published brass etching RFQ guidance also requests material grade, thickness, tolerances, quantity, finishing, inspection, and packaging requirements.
Before mass production, test the sample for fit, appearance, fold performance, paint or plating response, part removal, and packaging protection. Record approved drawing revisions so later batches are made to the correct version.
How to Evaluate a Photo-Etched Model Parts Manufacturer
A supplier should be evaluated on more than unit price. Review whether the manufacturer can:
- Explain how material and thickness affect the drawing.
- Provide a DFM review before production.
- Control full-etch and half-etch features.
- Support prototype changes without hard tooling.
- Inspect critical dimensions and visual quality.
- Manage forming, finishing, cleaning, and packaging.
- Control drawing revisions and repeat orders.
- Communicate risks before accepting the order.
Photo etching does not require the hard dies or molds used in many stamping processes, which can make design revisions easier during prototype and low-to-medium-volume stages.
Ask for a sample plan and inspection method. For a grille, open area and flatness may be critical. For a folded bracket, bend location and final angle may matter more. For a visible panel, surface consistency may be the main acceptance point.
The best supplier is not the one that accepts every drawing without comment. A useful supplier identifies weak features, unclear tolerances, unsuitable tab positions, and finishing risks before production.
How TMNetch Supports Custom Photo-Etched Model Parts
TMNetch states that it supplies custom photo-etched model parts for model cars, motorcycles, aircraft, trains, ships, tanks, buildings, bridges, machinery, and custom designs. Its model-parts page lists stainless steel, aluminium alloys, copper alloys, nickel-based alloys, and titanium alloys as available material groups.
TMNetch also states that photo etching is a non-contact process and that its published capabilities include fine features, thin materials, and critical-dimension tolerances subject to material and design conditions. Its one-stop service page lists related processes such as forming, plating, polishing, cleaning, inspection, and packaging.
For a project review, provide the drawing, metal, thickness, quantity, finish, forming needs, and critical dimensions. TMNetch can then assess whether the design fits its published process capability and whether changes are needed before prototyping.
FAQs
What material is best for photo-etched model parts?
Brass is often selected for parts that need easy forming. Stainless steel can be better when rigidity and corrosion resistance matter. Nickel silver may suit visible details that need a silver-coloured finish. The final choice depends on thickness, bends, appearance, and assembly.
How thick are photo-etched model parts?
There is no single standard thickness. Thin details may use very thin sheet, while frames or structural features may need more stiffness. TMNetch publishes model-part capability down to 0.05 mm, but the correct value must be checked against the material, geometry, handling, and tolerance.
Can photo-etched parts include fold lines?
Yes. Partial-depth or half-etched lines can guide bending. The drawing should show the etched side, bend direction, and required final angle. The supplier should confirm that the remaining thickness is strong enough for production and assembly.
What files are needed for custom photo etch model parts?
Provide a dimensioned DXF, DWG, STEP, vector PDF, or AI file where possible. Include material, thickness, critical dimensions, tolerances, half-etch layers, bend instructions, quantity, finish, and delivery format.
How should buyers choose a photo-etched model parts manufacturer?
Review DFM support, material experience, prototype capability, inspection methods, half-etch control, secondary processing, revision control, and packaging. Do not approve a supplier based only on the lowest price.
Conclusion
Choosing custom photo-etched model parts requires more than selecting a metal sheet. The model scale, part function, material, thickness, fine features, folds, finish, assembly method, and production volume must work together.
Start with a clear drawing and a practical sample-validation plan. Then use the supplier’s DFM review to resolve fragile bridges, small openings, tab positions, fold lines, and finishing risks. This approach improves fit, appearance, repeatability, and purchasing control before volume production.
Submit your model-part drawing, material preference, thickness, quantity, and finish requirements for a technical review.